
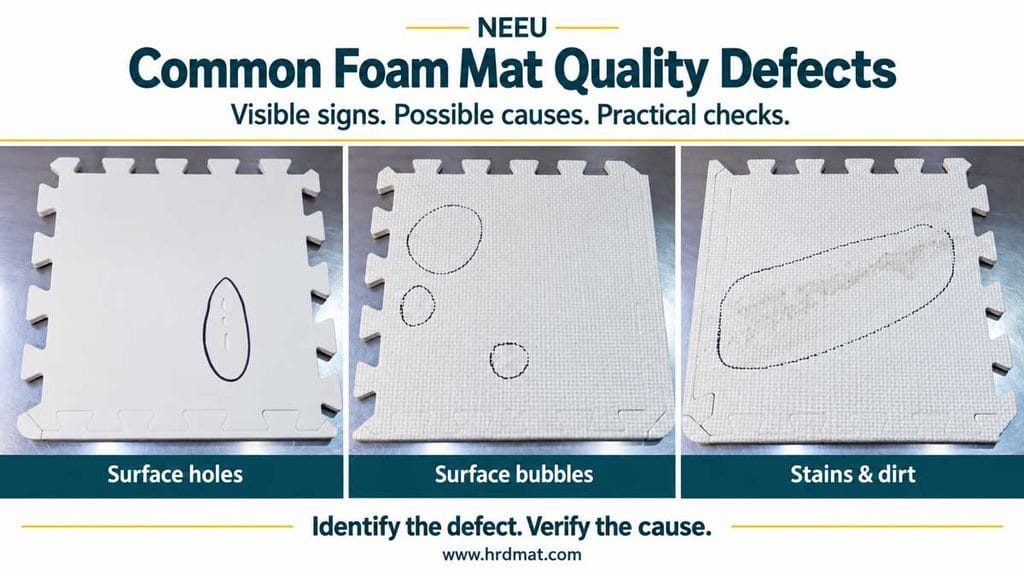
During incoming inspection, a buyer may find coarse holes along a cut edge, a tile that will not lie flat, visible shade differences, noticeable odor, or fragments around the puzzle teeth. The defects can be documented immediately. Their causes usually require comparison, records, and testing.
The same symptom can appear at different stages. A curled mat may reflect uneven cooling, lamination stress, or tight packing. A smell may come from the foam, an adhesive, printing, packaging or storage contamination. Large cells may indicate a local foaming problem, but a torn or poorly prepared cross-section can also exaggerate their appearance.
Treat appearance as evidence of where to investigate, not proof of a formulation or process failure. Compare the affected product with an approved sample, map where the defect occurs, review lot and process records, and use the relevant measurement or test before assigning a cause.
This guide covers common quality defects in EVA, XPE, TPE, PVC, and layered foam mats. It is designed for incoming inspection, sample approval, and supplier corrective-action discussions.
A quick foam mat defect triage table
| What you observe | Plausible causes to investigate | What the appearance cannot prove | First useful check |
|---|---|---|---|
| Isolated large cells, voids, or an uneven cross-section | Local variation in gas generation, mixing or dispersion; cell coalescence; insufficient structure retention; material contamination; sampling damage | A specific blowing-agent dosage or exact formulation error | Compare clean sections from several defined locations and lots at the same scale |
| Sunken, crushed, or locally collapsed foam | Processing-related cell instability; hot demolding or handling; packaging pressure; concentrated load; poor recovery; heat exposure | Whether the defect existed before packing or which recipe parameter caused it | Record location and depth, unpacking time, load history, and recovery at fixed intervals |
| Curl, bowing or warping | Uneven cooling or shrinkage; asymmetric layers, embossing or heat treatment; roll memory; tight packing; storage temperature | That the cutting die was inaccurate | Measure after agreed conditioning and compare flatness, diagonals, dimensions and layer construction |
| Color variation | Masterbatch or pigment dispersion; material-lot change; thermal history; surface texture or gloss; printing or lamination variation; lighting | A material-composition difference or chemical non-compliance | Compare under controlled lighting against an approved physical standard |
| Strong or unusual odor | Residual volatile substances; adhesive, ink or coating; trapped packaging odor; cleaning or storage contamination | Which chemical is present, its concentration, or product safety | Isolate the source by component and lot; use an applicable analytical test for chemical claims |
| Dirt, specks, or foreign matter | Dust or debris during conversion; transfer from equipment or packaging; handling contamination; embedded compound contamination | The stage at which contamination occurred | Determine whether it is loose, removable, transferred, or embedded; review location pattern and retained samples |
| Burrs, fuzz or rough puzzle edges | Worn or damaged cutting tool; unsuitable clearance or alignment; material compression during cutting; thickness or hardness variation; poor trimming or handling | That the foam formulation alone is defective | Inspect repeated edge positions, tool condition, cut direction and assembled fit |
| Dents that remain after unloading | Prolonged packing or point load; insufficient recovery for the use; heat-assisted set; layered-construction restraint | Density, hardness or service life from appearance alone | Measure depth after defined recovery periods and run a matched compression-recovery test |
| Peeling or delamination | Surface contamination; insufficient bond, heat, pressure or cure; incompatible layer movement; flexing or packing stress | Which adhesive or treatment failed without bond and process evidence | Map the interface, failure mode and affected area; compare peel behavior and production records |
The table is a starting point. Several causes can act together, and a defect may be introduced during manufacturing, conversion, packaging, transport, or use.
Before diagnosing a defect, preserve the evidence
Cleaning, airing out, flattening, or trimming a sample can make a defect harder to investigate. Start with a short containment record.
- Identify the product and scope. Record the SKU, construction, lot, carton, and manufacturing date, then count the affected units. Preserve conforming and nonconforming samples.
- Photograph and map the defect. Capture the whole product, a scaled close-up, and the label under consistent lighting. Mark the side, edge, or center; layer, sheet, or mold position; and carton position.
- Record timing and exposure. State when the carton was opened, how it was stored, and whether heat, pressure, cleaning agents, or prolonged loading may have affected it.
- Check the agreed requirement. Compare the approved sample, drawing, color standard, defect limit, and inspection plan. A visible difference is not automatically a contractual failure when no acceptance rule covers it.
Do not destroy the only affected sample for testing until the supplier, buyer, and laboratory agree on what to examine. For a dispute, chain of custody can matter as much as the eventual measurement.
Large cells, voids and uneven foam structure

A cut foam edge may show isolated coarse cells, a wide cell-size distribution, stretched cells, thin walls or areas that differ from the rest of the section. These observations can help identify abnormal regions, but they do not constitute a complete performance assessment.
During foaming, gas availability, nucleation, cell growth, and structure stabilization overlap. Local temperature, pressure history, mixing, dispersion, polymer state and the developing network can all influence the final morphology. If adjacent cells merge, a section may show larger openings and thinner walls. If expansion is restricted, it may show under-expanded or dense regions instead.
Published EVA/nylon-elastomer research illustrates why no single visual clue identifies a universal cause. In that experimental formulation series, changes in blend content and blowing-agent level affected cell size, distribution, density, hardness, and recovery. The authors examined several microscope fields rather than relying on one selected image.[1] Those footwear-oriented blends are not a formula guide for commercial mats, but the sampling lesson transfers: one dramatic cell does not characterize an entire sheet or lot.
How to investigate the cross-section
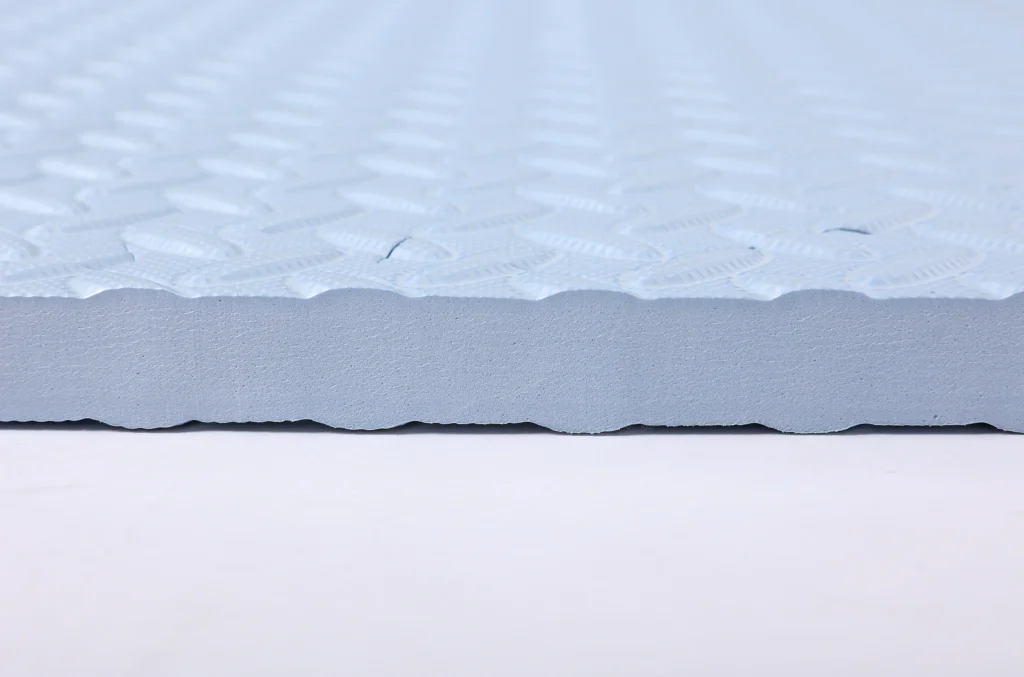
Prepare clean sections from agreed locations, such as the center, edge, and any visibly sunken region. Photograph them at the same magnification with a visible scale. Compare the distribution and frequency of abnormal cells, not only the largest opening.
Check density and thickness by location, then compare batch, mixing, foaming, and cooling records for the affected and conforming material. Review formulation or raw-material changes only when traceability shows that they coincide with the defect. Add hardness, compression-recovery, or tear data when the complaint concerns those properties.
The article on foam cell structure, cell size, and uniformity explains how to compare cut sections without automatically assuming that smaller cells are better.
A coarse section supports investigation of expansion and structure retention. It does not establish that too much blowing agent was used or identify any other single root cause without process and material evidence.
Collapsed areas, dents, and poor recovery
“Collapse” is often used for two different conditions:
- an internal structural area that did not retain its intended geometry during or soon after forming; or
- a finished mat that was crushed or set permanently under a later load.
The distinction changes the investigation. A process-related sunken area may repeat at the same mold or sheet position and exist before packaging. A packaging or use-related dent may correspond to a strap, carton stack, roll core, equipment foot, or stored object.
Measure depth and thickness at fixed recovery intervals after unloading, recording temperature, loading history, and support condition. A sample that improves after 24 hours and one that remains unchanged should not be described in the same way.
Hardness, density, rebound, and compression set answer different questions. A foam can feel firm on first contact yet retain a dent after a long static load. It can also show lively rebound while recovering poorly after prolonged compression. The foam compression set and recovery guide explains how loading, duration, temperature, and recovery time must accompany any percentage result.
If the issue appears only in a laminated mat, inspect the layers separately. A surface film, textile, adhesive or backing may change how the construction bends and recovers even when the foam core looks normal. Density may be relevant, but a dent alone cannot distinguish low density from cell damage, long-term set, heat exposure, layer restraint, or a localized load.
Warping, curling, and mats that will not lie flat
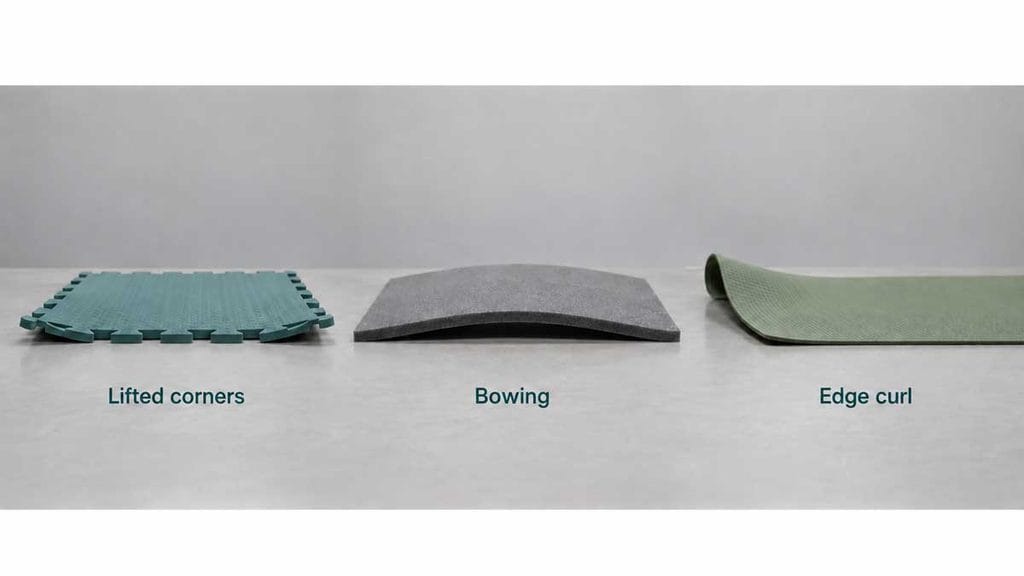
Warping can appear as lifted corners, a bowed center, edge curl, or a twisting panel. The pattern often provides a more useful clue than the maximum height alone.
- One edge curls along a roll direction: investigate winding tension, roll memory, storage orientation and asymmetric construction.
- All corners lift after unpacking: review packing pressure and recovery time, then compare cooling, conditioning, and geometry.
- A laminated mat bends toward one layer: investigate different shrinkage or tension between the foam and surface construction, as well as lamination heat and bond conditions.
- The same mold or sheet position repeats: compare process position, cooling, forming, and tooling records.
- Only one carton is affected: examine straps, carton fit, stacking, and transport exposure before assigning a production cause.
Measure flatness after a stated unpacking and conditioning period on a defined surface. Also record length, width, diagonals, squareness, and thickness. A flatness problem may occur with correct length and width; a size problem may occur in a mat that appears flat.
EVA foaming research has shown that crosslinking, gas generation, and molding conditions can interact with shrinkage in a formulation-specific process.[2] This supports an investigation into the upstream production record, but it does not mean that every warped mat was incorrectly foamed. Heat treatment, lamination, converting, and packaging remain plausible contributors.
For interlocking tiles, assemble randomly selected pieces into a multi-tile grid. A single tile can look acceptable, but small dimensional or angular differences can accumulate across an installation. Cutting accuracy should be checked, but warping and fit problems may enter before or after cutting. Use the foam mat dimensional-stability guide to separate initial cutting accuracy, post-production change, and assembled fit.
Color differences: material, surface, or viewing condition?
Color complaints often begin with a side-by-side photograph. That is useful documentation, but camera processing, mixed lighting, viewing angle, texture, and gloss can make the difference look larger or smaller than it is.
First establish whether the difference runs through the base foam, is limited to a molded skin, or appears only in a printed or laminated layer. Note whether it occurs between lots, within one mat, or only from a particular viewing direction.
Possible contributors include pigment or masterbatch dispersion, raw-material or recycled-content variation where applicable, processing temperature history, mixing sequence, surface replication, printing, lamination, and contamination. UV exposure, storage, and aging can also change color after production.
Compare the samples under controlled viewing conditions against the approved physical standard. Keep the orientation consistent and place samples on the same background. If the commercial tolerance requires an instrumental color difference, specify the measurement geometry, illuminant, observer condition, locations, and acceptance rule rather than quoting a bare Delta E value.
For patterned or multicolor products, define which differences are intentional. A natural marbled effect, a recycled-content speckle, and an uncontrolled streak are not the same defect category. A shade difference may justify checking formulation and lot records, but it does not prove a material change; surface texture, lighting, heat history, or printing can produce a similar appearance.
Odor: a sensory observation, not a chemical identification
Odor should be documented, especially when it differs from the approved sample or affects the unboxing experience. It should not be used to identify a chemical or declare a product safe or unsafe.
Potential sources include the foam system, processing residues, inks, coatings, adhesives, cleaning agents, bags, cartons, pallets, and contamination from the warehouse or transport. A sealed package can concentrate volatile substances, making the initial odor stronger than it is after exposure to fresh air.
Record the product, lot, carton, and affected component; the time between opening and assessment; room or chamber conditions; and whether the sample was sealed, aired, or reheated. If a sensory panel is used, record the number of assessors, the agreed rating method and the approved or retained comparison samples.
Do not ask assessors to guess a chemical from smell. If the purchasing requirement concerns VOC emissions or a named substance, use a method that matches that question. A chamber study of EVA, PE and XPE children’s mats found that temperature, sample loading, air exchange and elapsed time influenced measured VOC release under its specific conditions.[33] This is why odor observations and laboratory emission results need their own conditions.
An absence of noticeable odor does not prove chemical compliance. A noticeable odor does not identify formamide, a solvent, or another compound. Testing for content, emissions, and overall odor are different tasks.
A smell does not prove excessive blowing-agent residue. Separate the affected component, review packaging and storage, and obtain analytical evidence when a chemical claim affects acceptance.
Dirt, black specks, and foreign matter
Classify contamination before cleaning. Loose particles can be removed without marking the surface; transferred marks may originate from equipment, packaging, ink, or other products; embedded matter lies within the foam or surface layer. Isolate suspected biological or unknown growth for qualified assessment rather than diagnosing it from a photograph.
Distribution helps narrow the investigation. Specks through a cut section may point toward compounding or material handling; marks at regular intervals may correspond to equipment or stacking contact; contamination near carton openings may have entered during packing or handling. These patterns guide inspection but do not prove a source.
Record whether cleaning removes the mark and whether cleaning changes gloss, color, print, or surface feel. Do not release a cleaned product until the buyer’s appearance standard and any hygiene concern are resolved. A stain that can be removed may still indicate an uncontrolled process requiring correction.
Burrs, rough edges, and incomplete cuts
Puzzle teeth, outside edges, holes, handles, and die-cut graphics can show burrs, fuzz, hanging fragments, compressed edges, or incomplete separation. These defects affect appearance and may also interfere with assembly, cleaning, or handling.
Likely contributors include tool wear or damage, alignment and clearance, cutting pressure, sheet support, feed movement, material thickness or hardness variation, stacked cutting, ejection and post-cut handling. A dull tool can leave a different pattern from an edge damaged during packing, so examine several consecutive pieces and both sides of the cut.
Start by checking whether the defect repeats at the same position in the sheet or die layout. Compare the top and bottom of the cut, tool condition, maintenance records, thickness, and hardness at the affected position. For puzzle mats, also check tooth geometry, assembled fit, separation after repeated assembly, and loose fragments in the package.
The foam mat quality-control process provides the broader context for connecting incoming, in-process, and finished-product checks. The corrective action should address the stage that created the defect, rather than simply adding a final trimming operation, which may cause the problem to recur.
Other defects worth adding to the inspection plan
Delamination, bubbles and lifted surface layers
Mark whether separation occurs within the foam, at the adhesive interface, or within the film or textile. Investigate surface preparation, contamination, adhesive coverage, heat, pressure, cure or cooling, layer tension, flexing and packing. A visual bubble does not identify which bonding parameter failed. A defined peel or bond evaluation may be needed.
Cracks, splits, and whitening at folds or edges
Record the crack origin, direction, and depth. Edge notches, cutting damage, repeated folding, low-temperature handling, aging, stress concentration, and material variation may contribute. Surface whitening can be a stress indicator without being a full crack. Compare the approved folding or assembly cycle and relevant tear or flex test.
Thickness and surface-pattern variation
Map the thickness across the mat instead of reporting a single point. Embossed peaks and valleys need defined measurement locations and contact pressure. Uneven pattern depth may be due to forming, heat, pressure, tool contact, or sheet variation, but a measurement map and a process-position record are needed before choosing among them.
Printing defects
Missing ink, misregistration, smearing, poor adhesion, and color shift require separate controls. Record artwork revision, orientation, print position, curing or transfer conditions, surface preparation, and, where relevant, rub or adhesion performance. A print defect should not automatically be recorded as a foam-material defect.
From symptom to corrective action
Do not begin a supplier corrective-action request with a guessed cause. Begin with evidence that both sides can verify.
| Investigation field | What to record |
|---|---|
| Requirement | Drawing, approved sample, defect limit, test method, or buyer standard |
| Symptom | Neutral description without a root-cause claim |
| Scope | Lot, cartons, sample size, affected quantity, and defect rate |
| Location | Product side, sheet or mold position, edge, fold, layer, and carton position |
| Timing | Production, packing, transport, unpacking, and recovery history |
| Comparison | Approved sample, retained sample, conforming units and prior lot |
| Supporting data | Dimensions, color readings, recovery measurements, cross-section images or analytical results as applicable |
| Records to review | Material lots, formulation/change control, process parameters, tooling, cleaning, inspection and packaging |
| Containment | Hold, sort, rework, retest, return or release under an agreed concession |
| Verification | Evidence that the corrective action prevents recurrence in the next controlled lot |
A defect can be classified as critical, major, or minor only under an agreed inspection scheme and product risk assessment. Do not assign the class solely from how noticeable it looks. A small, loose fragment in a product intended for a young child may pose a different risk than a minor shade difference on an industrial floor tile.
When deciding disposition:
- Hold the lot when scope, safety relevance, or traceability is unclear.
- Sort when the defect is reliably detectable, and sorting will not introduce new damage or conceal the cause.
- Rework only under an approved method, followed by reinspection of the affected and related characteristics.
- Retest when the decision depends on a property or substance that cannot be determined by appearance.
- Accept by concession only when the buyer understands the deviation and documents the authorization.
- Reject when the agreed-upon requirement is not met, and containment or rework cannot produce an acceptable product.
A practical pre-shipment defect record
For every photographed defect, include the product and lot ID, construction, location, scale, lighting, date, inspector, affected count, and comparison sample. Add measurements only with their methods and conditions. Keep original files rather than relying on compressed screenshots from a messaging app.
The strongest record combines three views:
- Context: the entire mat and its position in the carton or production layout.
- Detail: the defect with a ruler, scale, or measurement reference.
- Pattern: several affected and conforming units showing whether the issue repeats.
This record is also useful during sample approval. Agreeing on photographs and limits before production reduces arguments over whether a later difference is expected variation or a defect.
Frequently asked questions
No. Acceptability depends on the approved construction, distribution, location, and required performance. Isolated voids or a deviation from the approved cell structure can warrant investigation, but cell size alone is not a universal quality metric.
Some packing distortion may reduce during conditioning; other warping persists because of dimensional change, layer stress or structural damage. Measure at agreed intervals and do not disguise a persistent defect by stretching the product before inspection.
No. Odor cannot identify a substance or concentration. Compare the sample using a defined sensory procedure, and use an appropriate analytical method when a chemical requirement must be verified.
There is no single allowance that applies to every product or defect. Define defect classes, sampling, acceptance quality limits where applicable, and any zero-acceptance conditions in the inspection plan. Product use and risk should guide the rule.
Build defect limits into sample approval
Do not wait for final inspection to decide what counts as an acceptable cell opening, color difference, curl, odor rating, stain, or edge burr. Set the visual references, measurement conditions, sampling and disposition rules with the approved sample.
Send NEEU your product construction, target use, defect concerns, drawings, and customer inspection requirements. The discussion can then focus on the sample evidence and production checks needed for that specific mat.
References
- Huang, G., Gui, Y., Li, Y., et al. (2021). Preparation and Characterization of EVA/Nylon Elastomer Microcellular Foaming Materials. China Plastics, 35(9), 1-7. https://doi.org/10.19491/j.issn.1001-9278.2021.09.001 ↩︎
- Feng, S., Liu, Z., Zuo, J., Zeng, J., and Hao, J. (2003). EVA Crosslinking Foaming Technology and Application. Plastics Science and Technology, 2003(2), 9-11. ↩︎
- Zeng, A., Wu, P., Luo, X., Wang, Y., and Wang, D. (2026). Volatile organic compound emission characteristics of children’s mats made from different materials and the factors affecting their release. Laboratory Testing, 4(10), May 2026. ↩︎