
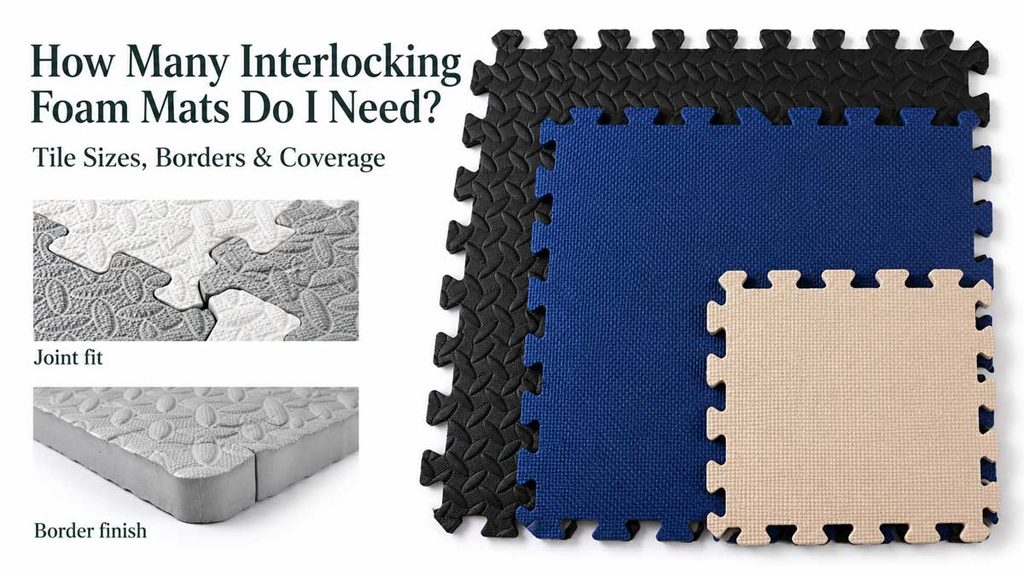
Calculate interlocking foam mat quantities from the assembled length and width, then convert the tile count into packs.** To cover at least a target rectangle, round the tiles needed along each side up and multiply. If an uncut mat must fit inside a fixed space, work from the maximum finished dimensions instead. Borders and the colors in each pack can change the order.
Dividing the floor area by the advertised tile area gives a useful first estimate. It does not tell you whether those tiles will cover the required length and width, whether offcuts can reconnect, or whether the pack includes enough of each color.
The worked examples below use hypothetical dimensions and pack contents to explain the calculations. They are not specifications for a particular NEEU product.
Measure the Area You Actually Want to Cover
For a freestanding mat area, mark the intended finished outline on the floor. For wall-to-wall coverage, measure the room in more than one place and record recesses, columns, doorways, and any out-of-square corners. A sketch with dimensions is more useful than a single square-footage figure.
Decide which edges will remain exposed and which will be trimmed or placed near a wall. Include projecting borders or ramps in the finished footprint and follow the product’s wall-clearance instructions.
Check door clearance against the assembled mat thickness and edge profile. Also confirm that the selected interlocking foam mats suit the activity and floor beneath them. Having enough pieces doesn’t mean they’re suitable for heavy equipment or dropped weights.
Do you need minimum coverage or a maximum outside size?
These are different buying decisions:
- Cover at least this area: buy enough rows and columns to reach both dimensions. The extra width or length must be acceptable or removable by an approved cut.
- Fit inside this space without cutting: choose the largest complete arrangement that stays within both limits, including edge finishes and required clearances. Some floor may remain uncovered.
For a 3.2 x 2.4 m space and a 0.60 m effective tile module, six by four tiles reach 3.6 x 2.4 m. Five by four tiles fit within the space at 3.0 x 2.4 m, leaving a 0.2 m strip uncovered if aligned to one end. Neither choice gives an exact uncut fit. These dimensions exclude additional border width; the border example below shows why that matters.
Which Tile Size Should You Use in the Calculation?
Nominal size is not always assembled coverage
A size such as “60 x 60 cm” can describe different measurement points. Check the drawing or ask the supplier what it includes.
| Measurement | What it tells you | What to check |
|---|---|---|
| Nominal size | The size used to identify the product | Whether it is rounded and what points were measured |
| Tooth-to-tooth size | The maximum outside dimension of one loose tile | Whether mating teeth overlap within that dimension |
| Tile body size | A dimension that excludes some or all of the teeth | Whether it corresponds to the assembled spacing |
| Assembled repeat distance | The length added by another tile in the same direction | Whether the first and last edges add an extra allowance |
| Finished layout size | The outside dimensions of a specified assembled arrangement | Whether borders, corners or ramps are included |
The simplest purchasing information is a confirmed layout drawing: for example, the finished length and width of a particular six-by-four arrangement. Do not apply a generic “interlocking loss” percentage. Different joint profiles and measurement conventions need different calculations.
Measure the assembled product without stretching it to reach a target. For manufacturing tolerances and changes after conditioning or transport, see our guide to foam mat dimensional stability.
A 24-inch tile is not exactly a 60 cm tile
Using the exact inch-to-metric conversion, 24 inches equals 60.96 cm, and 12 inches equals 30.48 cm. A listing that treats these as exactly 60 cm and 30 cm can introduce an error across a long row.
Keep all measurements in one unit and retain the actual dimensions during division. Round the tile count up for minimum coverage, or down for an uncut layout within a maximum space. If a listing gives conflicting metric and imperial sizes, ask which measurement governs the product.
Smaller or larger tiles?
Smaller tiles can give you more layout increments around a compact or irregular area, but require more pieces and joints for the same coverage. Larger tiles reduce the number of pieces to connect, though they may leave a wider strip to trim where a room does not match the module.
Neither size is automatically more economical. Compare the complete layout and pack count, not just the price per tile. Thickness, cushioning, and load suitability are separate decisions.
Calculate Rows and Columns Before Buying Packs
Start with how much length and width each connected tile adds. If those dimensions multiply directly to give the tile field, use this calculation for minimum rectangular coverage:
Tiles along the length = target length / effective tile length, rounded up.
Tiles across the width = target width / effective tile width, rounded up.
Full-grid tile count = tiles along the length x tiles across the width.
Account for the perimeter separately. If the first and last edges change the row length, use the supplier’s assembled-layout dimensions or the repeat-distance method below instead. For an uncut layout within a fixed space, subtract any net border extension from the available dimensions, then round each tile count down.
The full-grid count is a practical starting order before an optimized cutting plan. It is not always the smallest possible purchase if you can reuse suitable offcuts.
Worked example: a 3.2 m x 2.4 m area
Assume the confirmed coverage module is exactly 0.60 m x 0.60 m, with no extra perimeter width in this calculation.
| Step | Calculation | Result |
|---|---|---|
| Tiles along 3.2 m | 3.2 / 0.60 = 5.333…, rounded up | 6 tiles |
| Tiles across 2.4 m | 2.4 / 0.60 = 4 | 4 tiles |
| Full rectangular grid | 6 x 4 | 24 tiles |
| Untrimmed grid size | 6 x 0.60 m by 4 x 0.60 m | 3.6 m x 2.4 m |
| Excess length | 3.6 m – 3.2 m | 0.4 m |
For a freestanding area, you could accept the larger 3.6 m length if the space allows. For an exact fit, you’ll need a cutting plan, provided the product allows cutting. Position the cuts so the retained pieces still connect as intended.
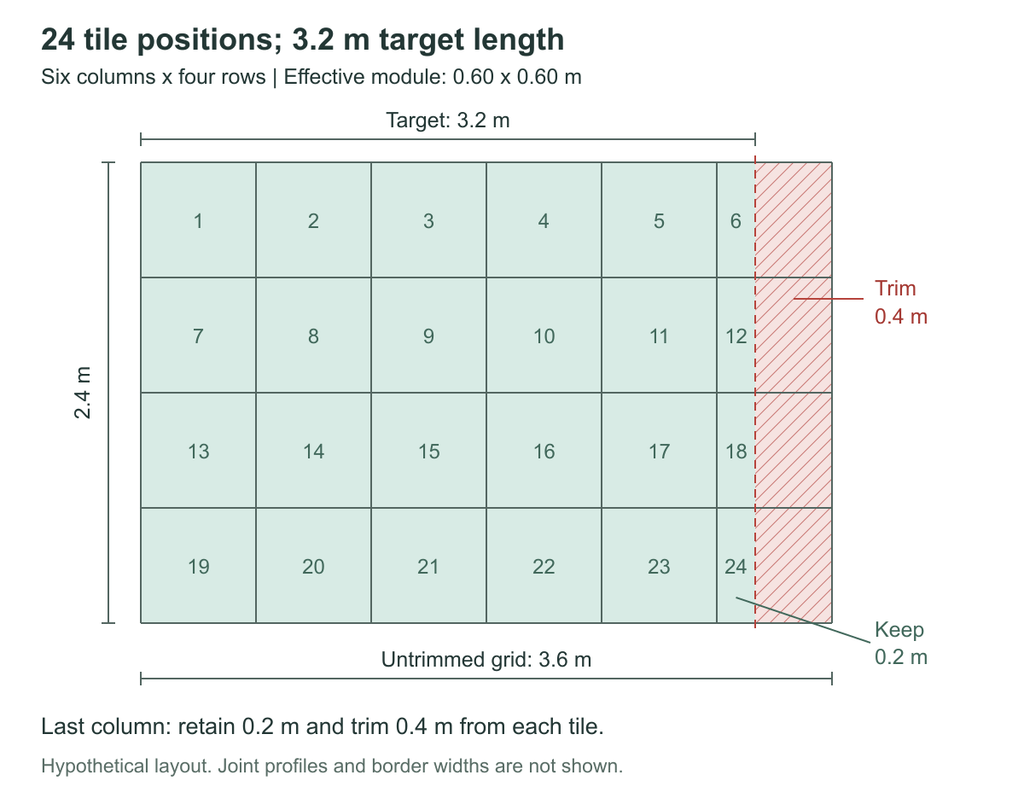
Layout example, not a product drawing. Each of the four tiles in the last column keeps a 0.2 m-wide section. The shaded 0.4 m strip lies outside the target; retained pieces still need suitable connecting edges.
Now compare the area-only calculation:
3.2 x 2.4 = 7.68 m²; 7.68 / 0.36 = 21.333…, rounded up to 22 tiles.
Twenty-two tiles provide enough total theoretical area, but they don’t demonstrate a workable arrangement. The six-by-four grid uses 24 tile positions. Buying fewer than 24 requires a specific cutting and reuse plan that preserves the necessary connections. Do not assume every offcut can replace another edge piece.
Quick examples for an effective 24 x 24-inch module
These examples assume each assembled module contributes exactly 2 x 2 ft and there is no additional perimeter allowance. They do not apply automatically to every tile sold as “24 inches.”
| Target rectangle | Grid | Tiles before spares | Four-tile packs |
|---|---|---|---|
| 6 x 8 ft | 3 x 4 | 12 | 3 |
| 8 x 10 ft | 4 x 5 | 20 | 5 |
| 10 x 12 ft | 5 x 6 | 30 | 8, supplying 32 tiles |
For rectangular rather than square tiles, calculate both orientations if the joint system and surface pattern allow rotation. The pack count can change.
When One Loose Tile Does Not Predict a Whole Row
Sometimes the outside size of one finished tile differs from the length added by each subsequent tile. In that case, multiplying the loose-tile dimension by the number of tiles is unreliable.
Ask for the dimensions of assembled rows with the same finish at both ends. For a uniform repeating system:
Finished row length = one-tile finished length + (number of tiles – 1) x repeat distance.
For example, suppose a one-tile row measures 61 cm with its end finishes, while a two-tile row with the same end finishes measures 120 cm. The added repeat distance is 59 cm. A five-tile row would therefore measure:
61 + (5 – 1) x 59 = 297 cm.
It would fall short of a 300 cm target, despite a nominal “60 cm” description suggesting that five tiles should fit. Under this hypothetical geometry, you’d need six tiles in that direction before considering cuts.
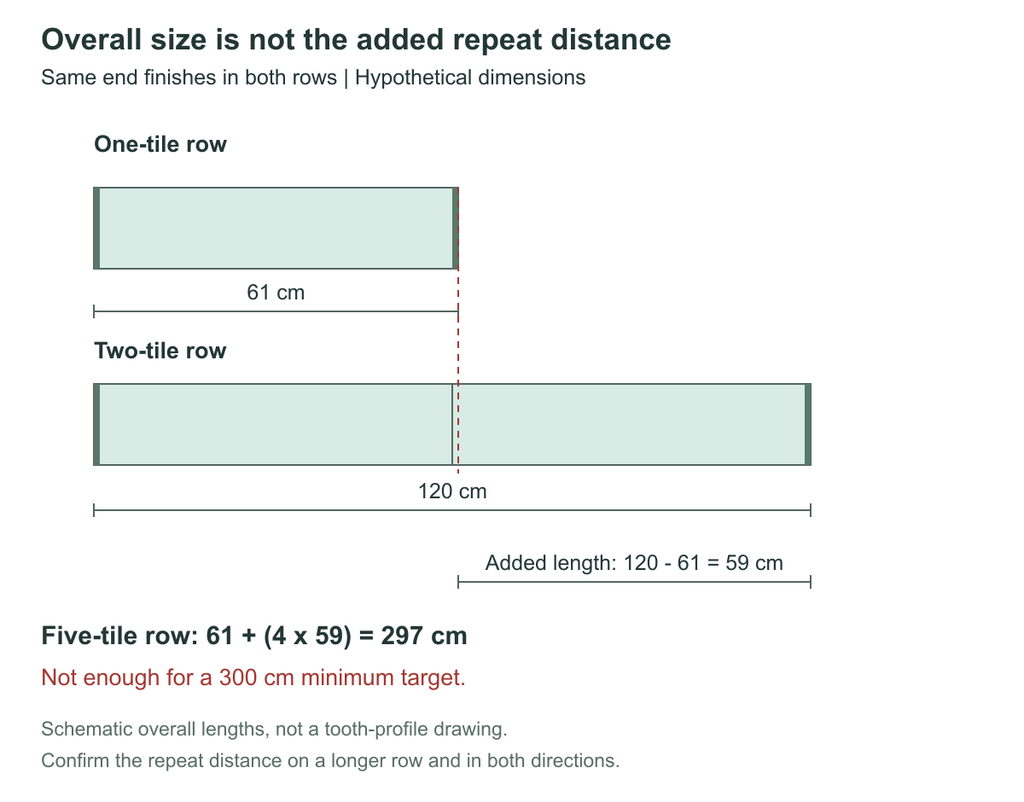
Hypothetical dimensions. The diagram compares overall lengths; it does not represent a particular tooth profile.
Verify the result on a longer assembled row and measure the other direction separately. A pair of tiles cannot establish how an entire batch will fit.
Count Borders Separately From Floor Tiles
Border strips finish exposed puzzle edges. They are not additional full tiles, and the number supplied in a pack may not match every possible arrangement.
For an uncut rectangular island of r rows and c columns, the number of exposed tile-side lengths is:
2r + 2c.
A six-by-four island has 20 exposed tile-side lengths: six on each long side and four on each short side. It needs 20 matching single-side strips only if that product uses one suitable strip for each exposed tile side. Corner pieces, combined edges, and directional connectors can change the actual parts list.
Check these details before ordering:
- Are border strips included, optional, or counted in the “piece” total?
- Do all strips fit every side, or are there different connector types?
- Are corners separate parts, or do the straight strips form the corners?
- Does a ramp project beyond the advertised coverage?
- Will trimming remove the teeth needed to attach a factory border?
For wall-to-wall or irregular layouts, mark each exposed edge on the drawing instead of using the rectangular-island formula. Do not assume edges against walls need the same finish without checking the installation instructions.
Include the border’s net extension in the outside dimensions
Suppose a tile field measures 3.0 x 2.4 m and its border extends 2 cm beyond the field on each side. The finished dimensions become:
Length: 3.0 + 0.02 + 0.02 = 3.04 m.
Width: 2.4 + 0.02 + 0.02 = 2.44 m.
That arrangement no longer fits within a 2.4 m-wide space. If you can’t trim or use a different edge finish, choose a smaller complete grid or a different tile size.
Use the border’s net outward extension, not its full loose width: the connecting section may overlap the tile. Keep the main tile-field area separate from the overall footprint, especially when a sloped ramp is included. The ramp’s footprint is not automatically additional flat exercise space.
Allow for Irregular Rooms, Cuts and Color Patterns
Draw one grid over an L-shaped area
Split the outline into non-overlapping rectangles, but keep their tile grids aligned. Count each occupied tile position once.
For a simple grid-aligned example, start with a six-by-four rectangle and remove a two-by-two block at one corner. The remaining L-shape contains 24 – 4 = 20 whole tile positions. This works because the missing corner follows the module exactly. A recess that cuts through tiles needs a separate cutting plan.
Likewise, do not simply subtract the floor area of a small column. You may still need a whole tile to cut around it. Mark narrow strips and awkward corners before assuming offcuts will cover them.
Reuse offcuts only where they actually fit
An offcut needs the right dimensions, usable joint edges, and surface orientation. Turning it around may not work with directional teeth, printed graphics, or a one-sided finish. Keep intact replacement tiles separate from these cut pieces in your count.
Numbered, lettered, or picture sets also need the correct pieces in the correct positions. Treat the design as part of the cutting plan; an otherwise usable offcut may carry the wrong part of the picture.
Convert the Layout Into a Purchase Quantity
Keep three quantities distinct: tiles required by your cutting plan, intact replacement spares, and surplus from buying full packs.
Packs of interchangeable tiles
When all the tiles in the selected pack can serve the positions you need:
Packs to buy = (tiles required by the plan + chosen spare tiles) / tiles per pack, rounded up.
Return to the 24-tile example. If you keep the full-grid cutting plan and choose two intact replacement tiles:
- Required tiles plus chosen spares: 24 + 2 = 26.
- Four tiles per pack: 26 / 4 = 6.5, rounded up to 7 packs.
- Tiles delivered: 7 x 4 = 28 tiles.
- Full tiles left uninstalled after allocating 24 to the layout: 4, including the two chosen spares and two additional tiles from pack rounding.
The 24-tile plan already includes the pieces being cut, so another blanket waste percentage can double-count material. Extra tiles may still be useful for a difficult cut or future replacement. Choose that allowance for the actual layout rather than automatically adding 10%.
Packs with a fixed color mix
Calculate each color separately, including any spares wanted in that color:
Packs needed for one color = (layout tiles of that color + its chosen spares) / tiles of that color per pack, rounded up.
If buying one fixed pack type, use the largest result across the required colors. For example, suppose the layout needs 20 black tiles and 4 gray tiles, and each pack contains 2 black plus 2 gray. With no additional spares specified:
| Color | Needed | Supplied per pack | Packs needed |
|---|---|---|---|
| Black | 20 | 2 | 10 |
| Gray | 4 | 2 | 2 |
The order is 10 packs, supplying 20 black and 20 gray tiles. Dividing the total 24 tiles by four would suggest six packs, but those packs would supply only 12 black tiles. Before accepting 16 surplus gray tiles, compare single-color packs or a different set composition.
A five-by-five checkerboard is more balanced: it needs 13 tiles of one color and 12 of the other. Packs containing two of each require seven packs, leaving one tile of the first color and two of the second. Those leftovers can count toward the spares you want; they don’t automatically require another allowance.
This largest-result method assumes every required color is available in that one pack type. If a color is absent, or you combine different pack compositions, list the actual contents of each proposed pack combination and check every color total.
For replacement stock, confirm the exact joint profile, thickness, surface, and product version. Matching nominal dimensions alone does not establish compatibility, and a later purchase may differ in color or fit. If existing joints are separating, diagnose why interlocking foam mats come apart before assuming extra pieces will solve it.
For Retail and Wholesale Buyers: Define What a Set Covers
A coverage claim should describe a layout the customer can actually assemble. Separate the number of full tiles from accessories, and state whether the advertised dimensions include the perimeter finish.
A useful set specification includes:
- Full tiles per set and quantities by color or design.
- Nominal dimensions, measurement points and assembled repeat dimensions.
- The illustrated layout and its finished outside dimensions.
- Border, corner and ramp quantities, with part types identified.
- Whether quoted coverage includes borders or only the main tile field.
- Whether the order unit is one tile, one retail set or one shipping carton.
For example, a hypothetical set with four tiles, each contributing a confirmed 0.60 x 0.60 m module, forms a 1.20 x 1.20 m two-by-two tile field: 1.44 m² before any additional perimeter width. If the set includes eight separate border strips, describe it as “4 tiles plus 8 border strips,” rather than leaving “12 pieces” unexplained.
Foam formulation and processing influence EVA’s cellular structure, but that material description does not establish a set’s dimensions. Specify the finished construction and how its size will be checked. ISO 1923 addresses linear measurement of cellular plastics and rubbers; agree separately on tolerances, conditioning, and assembled-layout acceptance.
Use the foam mat RFQ template to keep these requirements consistent across quotations. Compare price per complete usable layout, including the packs and edge components needed, rather than price per loose tile alone.
Questions to Resolve Before Ordering
If the confirmed effective module is exactly 2 x 2 ft, a 10 x 10 ft square needs a five-by-five grid, or 25 tiles. Four-tile packs require seven packs, supplying 28 tiles and leaving three intact spares for this uncut layout. A different 100-square-foot shape may need a different cutting plan, so area alone isn’t enough.
First establish whether “nine pieces” means nine full tiles or includes accessories. Then check the assembled dimensions of the proposed arrangement. If it means nine full tiles with an effective 30 x 30 cm module and no extra perimeter width, a three-by-three layout measures 90 x 90 cm, or 0.81 m². Different module dimensions give different results.
Only if the manufacturer confirms that the formats connect as a system. A large tile’s nominal side length being twice that of a smaller tile does not guarantee matching teeth, thickness, or assembled spacing.
Ask for full-tile count, assembled layout dimensions, and border inclusions. Pack area can help you compare options, but it can’t, by itself, tell you whether a particular room outline or color pattern will fit.
Turn the Layout Into an Order
Before paying, match the cart to your drawing: full tiles by color, edge components, intact spares, and finished outside dimensions. After delivery, dry-assemble before making irreversible cuts.
For a custom retail or wholesale set, attach the drawing to your interlocking mat customization brief and request confirmation of the assembled dimensions and pack contents together.